We Are Unable to Connect Right Now. Please Check Your Network and Try Again Later Sharepoint
Outlook: We are unable to connect right at present
If you are trying to start the Microsoft Outlook awarding on your Windows x computer simply you lot suddenly receive a message box with an error message that says, "We are unable to connect right at present, Please cheque your network and endeavor again later", read on as this post will guide you on how yous tin set up this error. This kind of fault in Microsoft Outlook could be due to some issues with your internet connectedness or it could also be due to the VPN software if you're using one. Whatever the cause is, there are several potential fixes you can cheque out to fix the error. Yous have to check your cyberspace connectedness or endeavour changing it. You could also try to disable your VPN software or restart your computer or Microsoft Outlook and effort starting the app once again. In addition, you can also endeavor entering your countersign once more or check some settings in the Windows Registry or open Microsoft Outlook in Condom Mode. Refer to the guidelines provided beneath to farther troubleshoot the problem. The first thing you tin can practise to resolve the problem is to check your net connectedness. You take to brand sure that y'all are connected to the internet and that it has a stable connexion. The next thing you tin can do to fix the mistake is to restart your computer or Microsoft Outlook. This elementary process can really help you lot set the problem equally it could but be a glitch that can be fixed with a simple restart. You could as well try inbound your password again to resolve the error. Just click on the Abolish button to open a dialog box then enter your password again and see if it helps. Annotation that you might have to exercise it for all your e-mail IDs in Microsoft Outlook. Putting Microsoft Outlook into Safe Mode can help yous identify the problems in it. Safe Style also helps you fix a certain issue caused by some corrupted add-in. To start your Microsoft Outlook in Condom Mode, refer to these steps: As pointed out earlier, if you lot are using VPN, this could be the reason why you're getting the "We are unable to connect right now, Please check your network and try again subsequently" error and so the most obvious affair to do is for you to plough off the VPN and try to run the Windows Update once again. And if you use a VPN software that works using their software, you tin just completely exit or log-off from its business relationship. On the other hand, if y'all are using a built-in Windows 10 VPN, y'all can simply turn it off or delete all the settings you have created there.Option ane – Attempt to cheque your net connection
Choice 2 – Endeavour to restart your reckoner or Microsoft Outlook and try again
Option 3 – Try to enter your password again
Option 4 – Attempt opening Microsoft Outlook in Rubber Fashion and disabling its add-ins
Option 5 – Effort disabling the VPN
Choice 6 – Try to check the settings in the Registry
If you like to learn and discover out more near diverse Windows errors, and how to repair them go to our vast archive or use search to notice articles that will explicate and help you in solving your issue.
However, if y'all prefer to practice things fast and with automatization then we are proposing to utilize an automated solution for your issues. The applications that we are recommending are RESTORO & DRIVERFIX.
RESTORO is a one-click solution that will have care of your whole system. This programme is a useful tool that could repair corrupted registries and optimize your PC's overall operation. Bated from that, it as well cleans out your computer for any junk or corrupted files that help y'all eliminate whatsoever unwanted files from your system.
DRIVERFIX is the ultimate solution for all of your driver's needs. It fully automates the process of keeping drivers up to engagement and keeping free from bad and corrupt drivers. With its lightning fast scans and hudge library information technology is only one click solution for all Windows PC driver needs.
Visit our RESTORO or DRIVERFIX Download pages to inform yourself about all the benefits of this software and get a gratuitous trial copy of it.

RESTORO
One-click automated PC repair solution
With RESTORO you can easily
Privacy Policy | Terms of Use | Uinstall
RESTORO is uniform with all versions of Microsoft Windows including Windows 11
DRIVERFIX
One-click automated PC driver solution
With DRIVERFIX you tin easily
Privacy Policy | Terms of Use | Uinstall
DRIVERFIX is compatible with all versions of Microsoft Windows including Windows 11
Share this article:
You lot might also like
Error Code 48 – What is it?
Error Code 48 is a device driver mistake code that users can run into on any Windows 2000 operating system and later versions.
It occurs when the connected peripheral device cannot be run as the Windows operating arrangement's driver required to install the programs for peripheral devices has either been corrupted or is incompatible with the system.
It prompts the user with the following message on the screen:
The software for this device has been blocked from starting considering information technology is known to have problems with Windows. Contact the hardware vendor for a new driver. (Code 48)
Solution
 Error Causes
Similar nigh other Windows fault codes, error code 48 is triggered by the following factors.
- Corrupted system registry files
- Presence of viruses in the device
- The device driver is out-of-date
If this error lawmaking is not rectified, it could give birth to other driver device errors such as error code 52.
Further Information and Manual Repair
Method 1 – Run a complete scan for malware and spyware
Identifying and removing the viruses in the organisation registry and in the connected devices is the easiest method to prepare the corrupted registry files.
Viruses such as spyware and malware infect the registry entries and swallow upwardly the files that lead to incomplete or missing information. This creates problems for installing external devices as the driver required to install them is not consummate.
Method 2 – Use Arrangement Restore
You can too use system restore to eliminate the problem. Here is how y'all can use it:
- Log in using an Administrator business relationship
- Click 'Start' button and select All Programs > Accessories > System Tools > Organisation Restore
- Click 'Restore my computer to an earlier time' and click 'Next'
- Select the last Windows to restore betoken from the 'On this list, click a restore betoken' listing, and click 'Next'
- Click 'Adjacent' on the confirmation window to proceed
- Restart your PC after restoration is complete
By restoring the system via the final saved system checkpoint, you tin can obtain undamaged Windows organisation registry files that tin aid resolve the fault code.
Method 3 – Manually uninstall and reinstall the device commuter
Since Error Code 48 is due to a missing or an out-of-date device driver, uninstalling and and so reinstalling the device driver can aid solve the error.
You tin do this by firstly logging in as Administrator and opening Device Manager. Select the device that is causing the problem and double click it; make sure that the peripheral is connected properly to the PC.
Upon opening, click on the 'Commuter' tab and so select 'Update Driver'. Make certain to refer to the organisation documentation that yous received with your PC or calculator to check for the motherboard details and driver specifics.
Method 4 – Use software to automatically download the driver
Manually uninstalling and reinstalling the commuter will exercise the flim-flam; notwithstanding, it may be time-consuming particularly when y'all would have to resort to your hardware user manual. Therefore, using a programme such as CommuterFIX tin can salve you a lot of fourth dimension and frustration in having your device work properly on your calculator. DriverFIX, with its user-friendly approach to assist yous fix your PC problems, comes with an integrated database that detects which drivers you demand to reconfigure inside but a few seconds and downloads it automatically. It further ensures that your drivers are installed in their entirety leaving no room for any incomplete files to remain that create Fault Code 48. It also has the added advantage of being able to fill-in and restores your files should there be the slightest possibility of system file damage. DriverGear up is the respond to fixing your PC error codes accurately and apace. Click here to download DriverFIX to fix Error Lawmaking 48 quickly and effectively!
Read More
If you are trying to re-create large files that are over 4GB to a USB flash drive or SD bill of fare, merely you lot suddenly get an mistake bulletin saying, "File Likewise Large, The file is too big for the destination file system", read on equally this mail service volition aid you fix this trouble. A user recently reported that while trying to copy a 4.8GB zipped file from a Windows ten PC to a new 8GB USB drive just only got the File Too Big error message instead. If you share the aforementioned problem with this user and you know that there is more than enough available space for the file in your USB drive or SD card, continue reading until you get to the instructions provided in this mail service so that you will exist able to re-create the file successfully. Information technology is most likely that the USB drive has been FAT32 formatted which is why you're unable to copy the file and got an fault. The FAT32 file system has a built-in limitation on the size of the individual file that information technology may incorporate. For case, information technology's 4GB so even though collectively, it may accept files or even 1TB individually it shouldn't be more than 4GB. Thus, you need to alter the file organisation from FAT32 to NTFS. To practice that, carefully follow the instructions provided below.
- Pace 1: Connect the USB drive and open the Windows File Explorer.
- Step 2: Subsequently, right-click on the USB drive letter of the alphabet and select Format from the context menu.
- Footstep three: Next, select NTFS instead of FAT32 the instant a dialog box appears from the driblet-downwards carte for the file system.
- Step 4: At present click on the Quick Format selection and then click the Starting time button to reformat the USB bulldoze.
Note: There is also some other fashion you can change the file system. In this alternative way, you need to open an elevated Control Prompt and type the convert 10: /fs:ntfs /nosecurity control, and hitting Enter to execute information technology. Remember that in this command, "X" is the letter of your USB bulldoze so whatsoever the letter of your drive is, y'all demand to make sure to put it instead of "Ten". In one case the process is completed, attempt copying the file again.
Read More
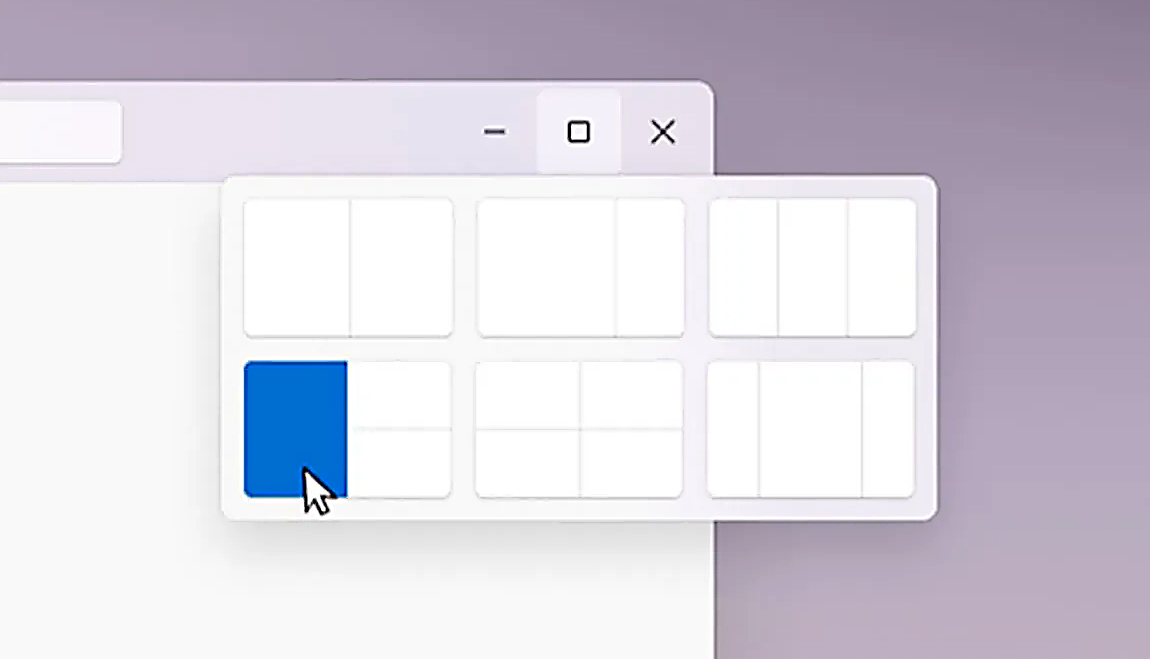
The Snapping feature was introduced as an essential role of Windows eleven and I like it very much, it lets you organize your opened windows much faster and with more control. However, some people do not like the feature, worry not considering you lot tin turn information technology off, or if y'all prefer y'all tin merely remove the showing layout option that is shown when hovering over Minimize/Maximize button.
 Removing options all together
To completely plough off Snap layout in Windows 11 follow these steps
- Open Windows 11 settings by pressing ⊞ Windows + I
- Select System on the left function of the screen
- In System options select Multitasking
- At the top of Multitasking Click on the switch next to Snap Windows
- Shut settings
Changes will exist automatically applied and you will no longer have Snap layout functionality.
Removing layout graphic from Snapping feature
If you like the snap Layouts feature but are not very addicted of the layout graphic that is popping upwardly each time you hover over Minimize/Maximize push button do not worry, at that place is an choice to turn just that off and keep the feature itself.
- Open Windows 11 settings by pressing ⊞ Windows + I
- Select Organisation on the left part of the screen
- In System options select Multitasking
- Click on the Snap Windows menu
- Conciliate Bear witness Snap Layouts When I Hover over a Window's Maximize button
- Close settings
Now y'all will be able to utilise the Snap Layout feature without layout graphics showing. If you desire to reverse whatsoever of these options and become back to standard-setting, just follow the steps and turn features ON.
Read More than
As you know, Airplane manner is the one that gets devices in such a state where all the wireless connections are turned off. All the same, recently, there are some reports from users challenge that the Airplane Style turns on by itself in their Windows ten computers. This kind of problem could be due to an error with the Network commuter, third-political party applications, and many other factors. Other users also reported that the Plane Way automatically flickers, while some stated that they aren't able to toggle the option for Aeroplane mode. There are several options you can try to resolve this problem. You can try to configure the Power Direction settings for the driver or run the Network troubleshooter. You could likewise roll back, reinstall or update the Network commuter, as well as troubleshoot the trouble in a Clean Boot State. For more details, follow each i of the given options beneath.
Selection 1 – Try configuring the Power Direction settings for the driver
The start matter you can practise to fix the problem is to endeavour configuring the Ability Management settings for the driver. How? Refer to these steps:
- Tap the Win + X keys to open the WinX carte du jour and from there, select the Device Managing director to open information technology.
- Next, expand the Network adapters and select the entry for your Wi-Fi hardware.
- After that, right-click on it and select Properties.
- From there, become to the Ability Management tab and uncheck the "Allow the computer to turn off this device to save power" choice.
- Once done, restart your computer and see if it has fixed the trouble.
Option 2 – Attempt to run the Network troubleshooter
To run the Network Troubleshooter, refer to these steps:
- Open up the Search bar on your estimator and type in "troubleshoot" to open the Troubleshoot settings.
- Next, coil downward and select the "Network Adapter" option from the right pane.
- So click on the Run Troubleshooter" button.
- After that, your computer will cheque for any possible errors and volition pinpoint the root cause of the trouble if possible.
- Restart your reckoner.
Option 3 – Attempt to update, rollback or reinstall the Network adapter drivers
The next thing you tin can do to resolve the trouble is to update the Network Adapter drivers by post-obit these steps:
- Tap the Win + R keys to launch the Run window and so type in the "devmgmt. msc" control and hit Enter to open the Device Managing director window.
- Nether the Device Manager, you will see a list of drivers. From at that place, look for the Network Adapters and expand them.
- Expect for the Broadcom Network Adapter and correct-click on it, as well as other network adapters that have an exclamation icon, and update them all.
- Restart your PC and see if it helped in fixing the problem.
Annotation: If updating the network drivers didn't help in fixing the problem, y'all can also endeavor to roll back the very same drivers from their previous versions and restart your Windows ten PC. After that, the organisation itself volition reinstall the drivers y'all just uninstalled. Alternatively, you tin can likewise download and install the drivers from the manufacturer's website directly. To reinstall the network adapter drivers, refer to these steps:
- Open the Devices Manager from the Win Ten Card.
- And so locate the device drivers and right-click on them to open up the Properties.
- After that, switch to the Driver tab and click on the Uninstall Device push.
- Follow the screen option to completely uninstall it.
- Finally, restart your computer. Information technology will simply reinstall the device drivers automatically.
Option 4 – Try to reset the Network Adapter
You can also effort to perform a Network Reset to resolve the problem. This will reset the entire network configuration including your IP address. To perform Network Reset, follow these steps:
- Tap the Win + I keys to open Settings.
- From there, go to the Network and Cyberspace section.
- Next, scroll down and expect for "Network Reset" nether the condition pane.
- After that, click on Network Reset and and so on Reset now to start resetting the network configuration. Once done, check if it is able to fix the fault or not.
Option 5 – Try putting your computer in a Clean Boot State
You tin can besides troubleshoot the problem in a Make clean Boot state. Information technology could be that at that place are some tertiary-political party applications in your calculator that are causing the Airplane Mode to conduct in a strange mode. So, to isolate this possibility, yous need to boot your computer in a Clean Kick Country be using these steps:
- Log onto your PC as an ambassador.
- Type in MSConfig in the Start Search to open the System Configuration utility.
- From there, get to the General tab and click "Selective startup".
- Clear the "Load Startup items" check box and make sure that the "Load Arrangement Services" and "Use Original boot configuration" options are checked.
- Next, click the Services tab and select the "Hibernate All Microsoft Services" bank check box.
- Click Disable all.
- Click on Apply/OK and restart your PC. (This will put your PC into a Make clean Kicking Land. And configure Windows to use the usual startup, just simply disengage the changes.)
- Subsequently you've set up your estimator into a Clean Boot State, try to observe if the Airplane manner is now dorsum to normal or not.
Read More than
Repair MSI.chm Error
What is the MSI.chm Mistake Code?
MSI.chm error is a common Windows Error code that occurs when the Windows OS becomes overloaded with invalid system references.
Solution
 Fault Causes
The MSI.chm fault is normally triggered by the following causes:
-
Poor PC maintenance
You may experience the MSI.chm error if you don't pay attending to its maintenance. This usually happens when you lot don't run antivirus software or update programs and drivers often.
-
Registry files get corrupt and damaged
This fault may also occur when the registry files of your PC get corrupt and damaged. This normally happens due to continuous writing, editing and deleting of information from your PCs registry over fourth dimension as programs are installed, modified and deleted. Other causes include: malware and system conflicts.
Further Data and Transmission Repair
When you come beyond the MSI.chm error on your PC, it is advisable to repair it immediately without whatever delays. If you procrastinate in repairing this mistake, your PC is likely to be exposed to risks like:
- Slow PC performance
- Arrangement failure and crashes
Nonetheless, to resolve this error you don't take to become the assistance of an IT professional person. The MSI.chm is easy to repair and you can resolve information technology in no time even if y'all aren't technically expert. Hither are some of the best means to repair the MSI.chm error on your PC successfully in the shortest fourth dimension:-
Cause: Corrupt and Damaged Registry Files
Quick Prepare: If you call back the MSI.chm Windows mistake on your system is related to Windows registry problems, then the best mode to resolve this error is to download and install a Registry cleaner tool. A word of advice here is to always download such tools from a reliable and a trusted website. In one case you lot download the Restoro, run information technology on your PC to browse for errors. The scanning will usually take a couple of minutes. So, it is advisable to be patient. Later on the scanning is complete, you lot will see a detailed scanning report highlighting the registry errors on your PC. Now to resolve the MSI.chm fault that has occurred on your PC due to registry issues, click on the 'Repair' button to fix the error. Once the repairing process is complete, restart your PC. Restoro helps y'all not only fix the MSI.chm error only it too helps improve the speed of your PC, and protects information technology from failure and crashes.
Crusade: Poor PC Maintenance
Quick Set up: If the cause of the MSI.chm error is poor PC maintenance, then the best way to resolve the error is to update the drivers. You tin do this by installing the latest drivers for the devices that you think are now old and demand to be updated. Hither's what y'all need to do: First find which devices don't have drivers installed. For this get to the start carte and so click on the Command Console. At present open the Device Director. The Device Director will list down all the devices that don't have drivers installed with yellow exclamation point icons next to the device name. Every bit for the updates, the full general rule of thumb if the driver does not back up the program yous are trying to run, and then this ways that you probably need to update the commuter to ensure compatibility. For instance your video card driver does non support a newly launched game, then y'all definitely need a driver update to play the game on your PC. To install or update drivers on your PC, you tin can either get CDs from the market or you lot can download updated versions of the drivers from the chief manufacturer's website for costless. You tin besides use automated solution for all of your commuter issues: So, side by side fourth dimension when you or your friends encounter this problem, try these quick fixes to repair the error without any hassle.
Read More
 Windows 11 provides several different ways to make your cursor stand out and be easier to spot within it. You tin can make the mouse arrow larger, invert information technology, or change its color.
- Press ⊞ WINDOWS + I to open settings
- Click on Accessibility in the sidebar
- Select Mouse Pointer and Touch
- Adapt mouse cursor size with size slider past clicking on circle and dragging it left or right
- Under Mouse Pointer Style pick desired fashion from White, Black, Inverted, and Custom
- White: The cursor is white with a black outline (standard setting)
- Blackness: Cursor is black with a white outline
- Inverted: Cursor automatically changes color to an inverted version of the color it is currently hovering over
- Custom: Yous can selection the color for the cursor that yous want.
And that is all most it, once you lot are washed with arrow customization just close settings, all changes are saved automatically.
Read More than
In this post, you volition be guided on what to practise if the Recent Items are no longer visible in the Taskbar icons in Windows 10. This can be quite inconvenient specially if yous work simultaneously on many files and documents together and would crave you to visit them regularly to comprise changes. Thus, if you find that the Recent items are not visible in the Windows Taskbar, read on. In order for the Contempo Items to announced on the taskbar icons in Windows x again, at that place are four potential fixes you lot can bank check out. Y'all tin try to show the recently opened items via Settings or clear the cache of the contempo items. You could also make some changes in the Windows Registry or use the Grouping Policy Editor. But earlier you go on with these potential fixes, it's best if y'all create a Organization Restore Betoken first just in case something goes incorrect later you lot made changes in the organisation. The Organisation Restore Point allows yous to undo these changes and bring back the previous state of your computer. Thus, you demand to create one and so carefully follow the given options below.
Option one – Show the recently opened items via Settings
The first thing you tin do to set up the problem is to show the recently opened items through the Settings app.
- Open the Settings app and select Personalization.
- From there, select the Outset option and scroll downwards until you come across the "Show recently opened items in Jump Lists on Start or the taskbar" selection.
- Brand sure that its toggle button is turned on.
Option 2 – Try to clear the Contempo Items enshroud
- Tap the Win + E keys to open File Explorer.
- Next, copy and paste this link on the address bar: %AppData%Microsoftwindowsrecentautomaticdestinations
- One time you lot're in the given location, yous should see multiple files. Now select all these files and completely delete them.
Note: These files are automatically recreated when yous collaborate with the system similar performing tasks such as opening apps or accessing files.
- After that, become to this next location: %AppData%Microsoftwindowsrecentcustomdestinations
- Once there, delete all of its files and restart your calculator. This should resolve the trouble.
Selection iii – Endeavour making changes via Registry Editor
The side by side thing you lot can practice to fix the problem is to employ some tweaks in the Registry by following these steps:
- Tap the Win + R keys to open the Run dialog box and blazon "Regedit" in the field and hit Enter to open the Registry Editor.
- Next, navigate to this registry sub-path: HKEY_CURRENT_USERSoftwareMicrosoftWindowsCurrentVersion
- From there, select the Policies Explorer folder located in the left pane.
- Then move to the right pane and look for the "NoRecentDocsHistory" entry and right-click on it.
- At present delete this entry.
Note: This entry is the one that stores the Group Policy setting for "Do not keep the history of recently opened documents. The Group Policy adds this entry to the registry with a value of one if you enable the "Do not keep the history of recently opened documents" policy. On the other mitt, if y'all disable the policy by setting information technology to "Not configured" or deleting it, the Group Policy will delete the entry from the registry, and the system will human activity equally though the value is 0 – for instance, it keeps the history of the recently opened files in your computer.
Choice 4 – Endeavor to employ the Grouping Policy Editor
- Tap the Win + R keys to open the Run utility and type "gpedit.msc" in the field and tap Enter to launch the Group Policy Editor.
- Side by side, navigate to User Configuration > Administrative Templates > Start Menu and Taskbar.
- Afterward, double click on the "Do not keep a history of recently opened documents" policy located on the right panel. This is the policy that lets you lot enable or disable contempo items and frequent places.
- Now to enable the recent items, as well as the frequent places, feature, click on the "Disabled" or the "Not Configured" option.
- Once yous're done, close the Group Policy Editor and restart your PC.
Note: If yous choose to enable this setting, the organization and Windows programs will not create shortcuts to documents opened while the setting is in consequence. Bated from that, they besides stay only won't display the existing document shortcuts and the system volition empty the Recent Items carte du jour on the Offset menu and the Windows programs won't also display shortcuts in the Offset Menu. In addition, the Taskbar won't too evidence the recently opened or frequently used folders, files, or websites.
Read More
As you know, one of the most popular browsers these days is the Google Chrome browser. Browsing the web every 24-hour interval using your Chrome browser, leaves a trail of browsing history. Google uses the browser history to streamline and make the browsing experience a lot amend. But in that location are times when Chrome users experience problem in deleting their web browsing history, data, cookies, and cache. In this post, you will be guided through specific settings that will help you in getting rid of the browsing history in Chrome. In that location are several options you can take in clearing the browsing history in Chrome. But before you lot try them, you can try the basic i offset using the following steps:
- First, click on the three-dotted icon and click on History from the menu.
- Next, click on the Clear browsing data selection and select "All time".
- And so select the type of history y'all want to delete.
- Later that, click on the Clear Information button.
If clearing the browsing history in Chrome the old style didn't work, and then you lot can try to cheque out the options provided beneath.
Option 1 – Clear the cache using the File Explorer
The beginning matter yous can do is to clear the cache past using File Explorer. To go started, refer to these steps:
- Tap the Win + E keys to open up File Explorer.
- Adjacent, navigate to the post-obit paths:
- C:/Users/YOURUSERNAME/AppData/Local/GoogleChrome/User Data/DEFAULT/Enshroud
- C:/Users/YOURUSERNAME/AppData/Local/GoogleChrome/User Data/PROFILENAMECache
- From the given locations above, replace "YOUR USERNAME" with the user profile name you use and so search for a file named "Cookies".
- Now delete its contents.
Option 2 – Reset Chrome
Resetting Chrome can also help yous fix the error. This means that you volition be restoring its default settings, disabling all the extensions, add-ons, and themes. Aside from that, the content settings will be reset as well and the cookies, cache, and site data will also be deleted. To reset Chrome, here's what yous have to practise:
- Open Google Chrome, and so tap the Alt + F keys.
- Afterward that, click on Settings.
- Next, scroll down until you encounter the Advanced option, once you see it, click on it.
- After clicking the Advanced option, go to the "Restore and make clean upward option and click on the "Restore settings to their original defaults" option to reset Google Chrome.
- Now restart Google Chrome.
Option iii – Try to clean reinstall Chrome
In that location are instances when programs leave files backside after you've uninstalled them and the same matter can happen to Chrome and so before you reinstall Chrome, yous have to make sure that you accept deleted the User Data folder. To practice so, refer to the following steps:
- Hit the Win + R keys to open the Run dialog box.
- Adjacent, type "%LOCALAPPDATA%GoogleChromeUser Information" in the field and hit Enter to open the User Information folder.
- From there, rename the default folder and proper name it something else, e.g. "Default.onetime".
- Later that, install Google Chrome once again and check if the issue is now fixed.
Read More
The GifsGalore Toolbar from Mindspark Interactive Network, Inc. is proposed to active Web users who similar to embed GIFs into their emails and share entertaining GIFs with friends via social media services. The GifsGalore software can be added to your Internet client for free but you lot demand to be using Google Chrome, Cyberspace Explorer or Mozilla Firefox for the GifsGalore Toolbar to be activated.
When installed it hijacks your New tab page and default search engine irresolute them to search.myway.com. This extension also monitors user browsing action recording data such as: visited websites, clicked links, viewed products, etc. This data is later used to better target ads. While browsing the internet with this extension enabled you will run across additional pop-up ads, as well as sponsored links and injected ads throughout your browsing session, especially in search results.
About Browser Hijackers
Browser hijacking is actually a form of unwanted software plan, often a browser add-on or extension, which causes modifications in web browser's settings. There are diverse reasons why y'all may experience an cyberspace browser hijack; however commercial, advertizing, and marketing are definitely the main reasons for their creation. The idea would be to strength users to visit specific sites that are aiming to improve their site visitor traffic and generate higher ad earnings. It could seem naive, but about of these sites are not legitimate and could present a serious risk to your online condom. Browser hijackers can even let other vicious programs without your cognition further impairment the computer.
Find out how to identify a browser hijack
When your spider web browser is hijacked, the post-obit can happen: the browser'southward homepage is modified; bookmark and the new tab are also changed; the default search engine has been changed and your browser security settings have been lowered without your cognition; you see unwanted new toolbars added; unstoppable flurries of popup ads appear on your calculator screen; your web browser gets sluggish, buggy, crashes very often; you are prohibited access to particular web pages, including the site of an anti-malware software programmer similar SafeBytes.
How browser hijacker finds its way onto your estimator system
Browser hijackers might use drive-by downloads or file-sharing networks or possibly an e-mail attachment to reach a targeted reckoner. They may also come from any BHO, browser extension, toolbar, add-on, or plug-in with malicious purpose. Other times you might have unintentionally accepted a browser hijacker every bit part of an application packet (usually freeware or shareware). Examples of well-known browser hijackers are Fireball, CoolWebSearch. save, Ask Toolbar, RocketTab, and Babylon Toolbar.
Removal
Some browser hijacking could be quite hands reversed past discovering and removing the corresponding malware software from your command panel. Yet, certain hijackers are far harder to detect or eliminate since they might get themselves associated with some crucial estimator files that enable them to operate equally a necessary operating arrangement process. Additionally, manual removals demand deep organisation noesis and therefore tin be a very difficult job for novices. Installing and running an anti-malware program on the affected calculator could automatically erase browser hijackers and other malicious applications. Safebytes Anti-Malware has a sophisticated anti-malware engine to help you prevent browser hijacking in the commencement place, and mop up any pre-existing bug. And use a PC optimizer, like Total Organisation Care, to go rid of all related files in the registry and repair browser issues.
What you lot can do if Malware Stops You From Downloading Or Installing Anything?
All malware is bad, simply sure types of malware do a lot more impairment to your computer than others. Some malware is created to restrict or prevent things that you desire to practice on your PC. It may well non let you lot download anything from the cyberspace or stop you from accessing some or all websites, especially the antivirus websites. If y'all're reading this commodity, you may have infected by a virus that stops y'all from installing security software such every bit Safebytes Antimalware on your PC. There are some actions you can accept to circumvent this trouble.
Remove malware in Rubber Mode
The Windows OS includes a special mode known equally "Condom Mode" in which just the bare minimum required programs and services are loaded. If the malware is obstructing internet access and affecting the estimator, launching information technology in Prophylactic Mode allows you to download anti-virus and run a scan whilst limiting possible damage. To enter into Safe Mode or Safe Mode with Networking, printing the F8 key while the computer is starting upward or run MSConfig and find the "Safety Kicking" options in the "Boot" tab. Later yous restart into Safe Mode with Networking, you tin can download, install, every bit well as update the anti-malware program from at that place. At this signal, you could run the antivirus scan to remove computer viruses and malware without whatever interference from another application.
Download the security software using an alternating spider web browser
Web-based viruses tin be environment-specific, aiming for a item browser or attacking specific versions of the browser. If you are not able to download the anti-malware software program using Internet Explorer, it ways the virus could be targeting IE's vulnerabilities. Here, you should switch over to a different browser like Firefox or Chrome to download the Safebytes Anti-malware program.
Install and run antivirus from your USB drive
Another solution is to create a portable anti-malware program onto your USB stick. Adopt these measures to run the antivirus on the affected computer organisation. one) Make use of another virus-costless computer to download Safebytes Anti-Malware. ii) Plug the Thumb drive into the uninfected estimator. 3) Double click on the executable file to run the installation sorcerer. four) Select flash drive as the place when the sorcerer asks you lot where you wish to install the software. Do as instructed on the screen to finish up the installation process. v) At present, transfer the USB bulldoze to the infected figurer system. six) Double click the Safebytes Anti-malware icon on the thumb bulldoze to run the software. seven) Click on "Scan Now" to run a consummate scan on the afflicted figurer for malware.
How SafeBytes Anti-Malware Keep your Computer Virus Gratis
If you're planning to buy anti-malware for your desktop, there are enough of brands and utilities for you to consider. A few of them are good only there are lots of scamware applications that pretend as legit anti-malware programs waiting around to wreak havoc on your computer. You need to get with a tool that has obtained a potent reputation and detects not but viruses but other kinds of malware besides. Amidst few good applications, SafeBytes Anti-Malware is the strongly recommended software program for the security-witting private. SafeBytes anti-malware is a trusted tool that not only protects your PC completely but is as well extremely convenient for people of all ability levels. With its cut-edge technology, this application tin help you remove multiples types of malware which include viruses, trojans, PUPs, worms, ransomware, adware, and browser hijackers.
SafeBytes anti-malware provides a myriad of enhanced features that sets it aside from all others. Below are a few of the good ones:
Robust, Anti-malware Protection: Congenital upon a greatly acclaimed anti-virus engine, this malware removal tool can identify and remove several stubborn malware threats like browser hijackers, PUPs, and ransomware that other common antivirus software volition miss. Live Protection: SafeBytes gives yous round-the-clock protection for your personal figurer restricting malware intrusions instantly. They're extremely constructive in screening and removing numerous threats because they are regularly improved with new updates and alerts. Web Filtering: SafeBytes inspects the links present on a spider web page for possible threats and alerts you whether the website is safe to browse or not, through its unique safety ranking organisation. Fast Scan: SafeBytes's virus browse engine is 1 of the quickest and near efficient in the industry. It's targeted scanning greatly increases the grab rate for viruses which is embedded in various computer files. Very Low CPU and RAM Usage: SafeBytes is a lightweight and easy-of-apply anti-virus and anti-malware solution. Since it uses depression computer resource, this application leaves the computer power exactly where information technology belongs to: with you. 24/seven Premium Support: You will get 24/7 technical support to apace resolve any issue with your security tool. To sum information technology upward all, SafeBytes Anti-Malware offers superb protection combined with very low system resource usage with both great malware detection and prevention. You now may realize that this particular software does more than than only scan and eliminate threats from your reckoner. You'll become the best all-around protection for the money y'all spend on SafeBytes AntiMalware subscription, there isn't any doubt virtually it.
Technical Details and Manual Removal (Advanced Users)
To remove GifsGalore manually, go to the Add or Remove programs listing in the Windows Control Panel and select the plan you want to become rid of. For internet browser extensions, go to your spider web browser'due south Addon/Extension director and choose the improver you would like to remove or disable. You'll probably also desire to reset your web browser. If you cull to manually delete the system files and registry entries, use the post-obit listing to make sure you know precisely what files to remove before undertaking any actions. However, editing the registry is commonly a difficult task that but experienced users and professionals should try to set it. Moreover, some malware is capable of replicating or preventing deletion. Carrying out this malware-removal process in Safety Way is recommended.
Files: %LOCALAPPDATA%\GifsGaloreTooltab %UserProfile%\Local Settings\Application Data\GifsGaloreTooltab %UserProfile%\Local Settings\Application Information\Google\Chrome\User Data\Default\Sync Extension Settings\fnjgjdfhhakkbojkgmiihabbbjhgbchh %UserProfile%\Local Settings\Application Information\Google\Chrome\User Data\Default\Extensions\fnjgjdfhhakkbojkgmiihabbbjhgbchh %LOCALAPPDATA%\Google\Chrome\User Information\Default\Sync Extension Settings\fnjgjdfhhakkbojkgmiihabbbjhgbchh Registry: HKEY_LOCAL_MACHINE\Software\[APPLICATION]\Microsoft\Windows\CurrentVersion\Uninstall..Uninstaller GifsGaloreTooltab Uninstall Internet Explorer HKEY_CURRENT_USER\Software\Microsoft\Internet Explorer\LowRegistry\DOMStorage\gifsgalore.dl.tb.ask.com HKEY_CURRENT_USER\Software\Microsoft\Internet Explorer\LowRegistry\DOMStorage\gifsgalore.dl.myway.com HKEY_CURRENT_USER\Software\GifsGalore
Read More than
FreeMaps is a google chrome extension by Mindspark powered by Inquire or MyWay. This extension offers users a quick and easy way to discover the routes or locations that they desire. While all of this may seem appealing, this extension was classified every bit a Browser Hijacker by many anti-virus applications and was marked for removal.
When installed FreeMaps will alter your home page, new tab and default search engine to MyWay.com, information technology will monitor your browsing action and send it back to Mindspark ad servers. This information is later used/sold to improve display targeted ads depending on your search queries.
While browsing the cyberspace with this extension active you will see additional pop-upwardly ads, sponsored links, and injected ads displaying throughout your browsing sessions, and even injected into websites that should exist ad-free. Due to poor code optimization, these ads can sometimes encompass a function of the page, making it unreadable or inaccessible.
Nearly Browser Hijackers
Browser hijacking is a class of unwanted software, commonly a browser add-on or extension, which then causes modifications in the web browser's settings. Browser hijackers are capable of doing more than than simply changing domicile pages. These are typically used to force hits to a specific site, manipulating web traffic to earn ad revenue. It could seem naive, but nearly of such websites aren't legitimate and could present a major threat to your online safety. Every bit soon as the malware attacks your laptop or computer, it begins to mess things upward a whole that slows your computer down to a crawl. In the worse case, you will exist forced to tackle serious malware threats too.
How y'all can know whether the browser is hijacked?
Signs that your web browser is how-do-you-do-jacked include: your browser'south homepage is all of a sudden different; bookmark and the new tab are too modified; default web engine is modified; find new toolbars which you didn't add; unstoppable flurries of popup adverts evidence up on your computer screen; your browser has instability issues or exhibits frequent errors; you cannot visit specific websites such as home pages of anti-malware software.
Exactly how browser hijacker finds its way onto your computer
A browser hijacker could be installed on your PC if you check out an infected website, click an e-mail attachment, or download something from a file-sharing website. They tin also be deployed via the installation of a spider web browser toolbar, extension, or add-on. Some browser hijackers spread in user'south figurer systems past using a deceptive software distribution method known as "bundling" (usually through freeware and shareware). Typical examples of browser hijackers include Conduit, CoolWebSearch, OneWebSearch, Coupon Server, RocketTab, Searchult.com, Snap.exercise, and Delta Search. Browser hijackers tin record user keystrokes to get together potentially invaluable information that leads to privacy issues, cause instability on systems, drastically disrupt user'due south browsing experience, and somewhen slow downwardly the system to a bespeak where it becomes unusable.
Tips on how to remove browser hijackers
Some types of browser hijackers can be removed from your PC past deleting malicious software applications or any other recently installed shareware. Having said that, many hijackers are very tenacious and require specialized tools to eliminate them. Yous should think of conveying out manual repairs simply if you are a tech-savvy person since there are dangers associated with messing around with the figurer registry and HOSTS file. Professionals e'er suggest users to remove any malicious software including browser hijacker with an automated malware removal tool, which is better, safer and faster than the transmission removal procedure. One of the best tools for repairing browser hijacker malware is SafeBytes Anti-Malware. It volition assist yous remove any pre-existing malicious software in your pc and provides you real-time monitoring and protection against the latest threats.
How To Install Safebytes Anti-Malware On An Infected Calculator
All malware is inherently harmful, but sure kinds of malware exercise a lot more impairment to your reckoner or laptop than others. Certain malware goes to not bad lengths to preclude you from downloading or installing anything on your PC, particularly antivirus applications. So what should you lot do if malware prevents you from downloading or installing Safebytes Anti-Malware? Follow the instructions beneath to get rid of the malware in alternate ways.
Start Windows in Safe Mode
In the upshot the malware is fix to run at Windows start-up, then booting in safe fashion should avoid information technology. Only the bare minimum required programs and services are loaded when yous offset your PC in Safe Way. Here are the steps y'all should follow to starting time your figurer into the Condom Style of your Windows XP, Vista, or 7 computers (visit Microsoft website for directions on Windows viii and 10 computers). i) Hit the F8 key repeatedly equally soon as your PC boots, all the same, earlier the big Windows logo or black screen with white texts comes up. This should bring up the Advanced Kick Options menu. two) Utilize the pointer keys to choose Safe Style with Networking and press ENTER. 3) As shortly every bit this style loads, yous volition have an cyberspace connection. Now, obtain the malware removal software y'all desire by utilizing the internet browser. To install the program, follow the directions within the setup wizard. 4) After installation, run a total scan and allow the program get rid of the threats it discovers.
Obtain the anti-malware software in a unlike internet browser
Some malware mainly targets specific browsers. If this sounds similar your case, employ another web browser as it could circumvent the virus. If you appear to take malware attached to Cyberspace Explorer, then switch to an alternate internet browser with born safety features, such equally Chrome or Firefox, to download your preferred antivirus plan – Safebytes.
Install antivirus on a flash bulldoze
Hither'south nevertheless another solution which is using portable USB anti-malware software that tin scan your organisation for viruses without the demand for installation. Abide by these steps to run the anti-virus on the afflicted estimator arrangement. 1) Download Safebytes Anti-Malware or Microsoft Windows Defender Offline onto a virus-gratis PC. 2) Insert the USB bulldoze into the clean PC. 3) Double click on the exe file to open the installation wizard. 4) Select the flash drive as the location for saving the software file. Follow activation instructions. 5) Transfer the thumb bulldoze from the uninfected computer to the infected PC. 6) Double-click the Safebytes Anti-malware icon on the pen drive to run the program. vii) Printing the "Browse Now" button to start the virus browse.
Protect your PC from Malware With SafeBytes Security Suite
In order to protect your computer from many different internet-based threats, it is important to install an anti-malware application on your laptop. Even so, with so many anti-malware companies out in that location, these days information technology'due south tough to make up one's mind which one you should purchase for your PC. Some of them are nifty while some are scamware applications that pretend as legit anti-malware programs waiting effectually to wreak havoc on your PC. You have to be very conscientious not to selection the wrong product, especially if you purchase a premium application. When it comes to commercial anti-malware software options, the majority of people get with popular brands, similar SafeBytes, and they are very happy with it. SafeBytes anti-malware is a highly effective and user-friendly protection tool that is designed for end-users of all levels of computer literacy. This program could easily notice, remove, and protect your PC from the latest malware intrusions including adware, spyware, trojan horses, ransomware, parasites, worms, PUPs, along with other potentially harmful software applications.
SafeBytes has fantastic features when compared with other anti-malware programs. The following are some of the peachy features included in the software.
Live Protection: SafeBytes gives real-time active supervision and protection from all known viruses and malware. It'll continuously monitor your pc for hacker activity and also provides end-users with advanced firewall protection. World-grade AntiMalware Protection: Safebytes is built on the all-time virus engine in the industry. These engines will detect and remove threats even during the initial stages of a malware outbreak. Safe Browsing: SafeBytes inspects the hyperlinks present on a spider web page for possible threats and tells y'all whether the website is rubber to explore or non, through its unique safety rating system. "Fast Scan" Features: Safebytes AntiMalware, using its advanced scanning engine, gives ultra fast scanning which tin can speedily target whatever active online threat. Lowest CPU/Memory Usage: This software is lightweight and can work quietly in the groundwork, and will non touch on your calculator efficiency. Premium Support: Y'all can become 24/7 technical assistance to immediately resolve whatever issue with your security application. To conclude, SafeBytes Anti-Malware is really great for securing your laptop or calculator against all kinds of malware threats. Now you may realize that this particular software does more than than just scan and eliminate threats in your PC. If you're searching for the best malware removal awarding out in that location, and if you don't mind spending some dollars for it, become for SafeBytes Anti-Malware.
Technical Details and Manual Removal (Advanced Users)
If you lot'd like to manually get rid of FreeMaps without the utilize of an automated tool, it may be really possible to practise so by removing the plan from the Microsoft Windows Add/Remove Programs carte, or in cases of browser extensions, going to the browser'due south AddOn/Extension director and removing it. It's also suggested to mill reset your browser settings to their default state. If you opt to manually remove the organization files and registry entries, use the following list to ensure that you know precisely what files to remove before executing whatsoever actions. Please remember that this is for professional users only and may be challenging, with incorrect file removal resulting in boosted PC errors. In add-on, sure malware is capable of replicating or preventing removal. Completing this task in Safe Way is brash.
Files: %LOCALAPPDATA%\FreeMapsTooltab\TooltabExtension.dll %TEMP%\nsf516A.tmp\nsDialogs.dll %TEMP%\nsf516A.tmp\System.dll %APPDATA%\Microsoft\Windows\Cookies\[email protected][one].txt %LOCALAPPDATA%\Microsoft\Internet Explorer\Recovery\High\Active\RecoveryStore.E9B13F93-5957-11E6-93FC-0A00273BA4BE.dat %LOCALAPPDATA%\Microsoft\Windows\Temporary Cyberspace Files\Content.IE5\T1CS2ORS\installerParams[1].jhtml %TEMP%\nsf516A.tmp\installerParams
Read More than
![]()
Copyright © 2022, ErrorTools. All Rights Reserved
Trademarks: Microsoft Windows logos are registered trademarks of Microsoft. Disclaimer: ErrorTools.com is not affiliated with Microsoft, nor claim direct affiliation.
The information on this folio is provided for information purposes merely.
![]()
Source: https://errortools.com/windows/how-to-fix-outlook-error-we-are-unable-to-connect-right-now-in-windows-10/
0 Response to "We Are Unable to Connect Right Now. Please Check Your Network and Try Again Later Sharepoint"
Post a Comment